
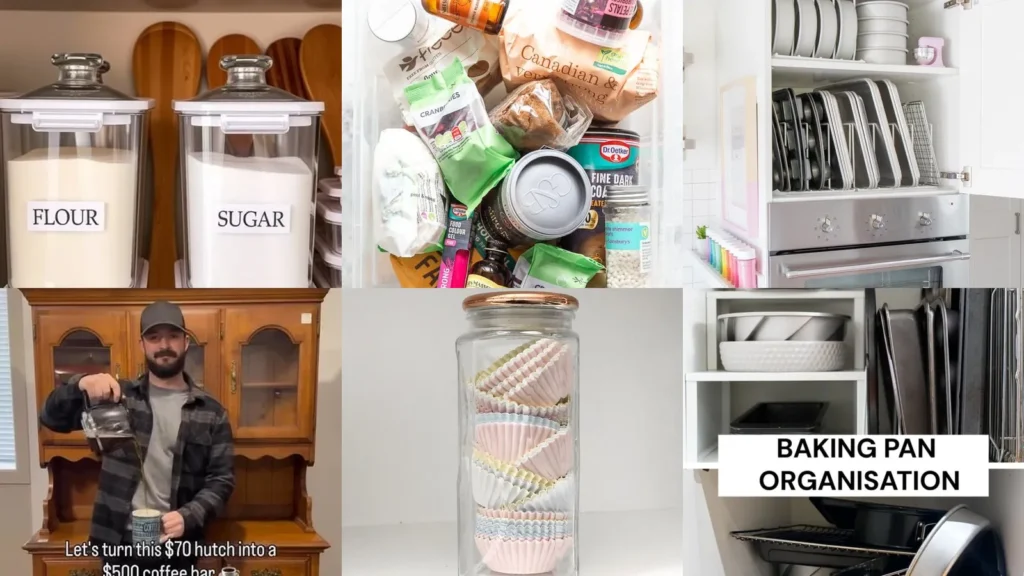

Looking for baking supply storage ideas that keep your pans and little decorating tools from getting lost? Clear ingredient containers, divided drawers and upright tray racks give you plenty to work with.
There are a few bigger cabinet ideas here too if your mixer needs a spot of its own.
You can keep it simple or give a whole cupboard a makeover. Start with the supplies you reach for most, then choose a setup that fits your kitchen.
Baking storage ideas worth saving
stacked containers and simple labels

We’re starting off strong with these neatly stacked containers. I love the big flour and sugar labels.
The white rims keep everything looking coordinated without hiding what’s inside.
Try matching containers for your everyday ingredients. Keep their labels facing forward so you don’t have to shuffle the whole shelf around.
a drawer for baking ingredients

How handy is this drawer? The large clear bins sit side by side, with a scoop resting in the front one.
You can see the contents from above rather than reaching behind bags in a cupboard.
If you want to try this, measure your drawer depth before choosing containers and their lids.
upright slots for pans

The pan stack doesn’t have to stay a stack! This divided organizer holds trays, racks and muffin pans on their sides.
I especially love the separate narrow slots. Choose spacing that suits your thickest pan rather than squeezing everything into the same-sized gap.
a sprinkle rack
I am obsessed with this sprinkle setup. The little jars have colored labels for pink, blue, green and more, with separate spots for mixed and holiday sprinkles.
Try a spice-style rack for your decorating collection. Those colored circles on the lids are such a cute detail to borrow.
one bin for baking extras
Don’t want to transfer every ingredient into a matching jar? No problem!
This clear bin groups packets, bottles and decorating supplies in their original packaging.
Read also: 20 Pantry Organization Ideas for Wire Shelves and Beyond
It’s a fairly full bin, so I’d stand the smaller bottles together at one end. That would make the little extracts easier to spot among the larger bags.
hooks and little wall shelves

If you are looking for a way to use an empty wall, this pegboard is worth a look. Pots and frying pans hang along the upper rail while utensils and a colander hang below.
The little shelves hold canisters and greenery.
For a baking version, you could hang whisks and measuring tools on the lower hooks. Keep the shelf arrangement if you like that mix of storage and display.
Read also: 20 Garage Shelving Ideas With Workbench Setups and Tool Storage
a lift-up mixer shelf

This mixer shelf may just be one of my favorite ideas here. The mixer sits on a raised platform attached inside the lower cabinet, with a basket and smaller pieces underneath.
Read also: 20 Coffee Table Ideas for Small Spaces Worth Saving
If you’re considering a similar lift, check its weight rating against your mixer before buying. The hardware matters just as much as the cabinet space.
a purple baking station

How cute is this little baking corner? The lavender mixer, matching utensils and purple baskets make the whole setup feel coordinated.
Ingredient containers sit on the top shelf while sieves and tools hang underneath. Try grouping your smaller supplies in baskets like these if you’re using an open shelving unit.
Read also: 19 Desk Shelf Organization Ideas From Pastel Cubbies to Simple Desktop Storage
pan dividers above the oven

I love how much baking equipment fits into this cupboard. Round pans sit upright on the top shelf beside a nested stack, with baking sheets and muffin pans lined up below.
Give the larger trays their own divided section if you want to follow this arrangement. You won’t need to lift a pile of pans just to reach one near the bottom.
open shelves full of jars

If you love seeing your ingredients on display, this one is for you. Rows of clear jars fill the open shelving, with different sizes sharing each shelf.
Read also: 20 Rustic Pallet Shelf Ideas for Storage and Display
You could borrow this pantry setup for baking ingredients and add readable labels to the fronts. I’d keep the supplies used most often on the easiest shelf to reach.
colorful decorating drawers

How adorable are these drawers? Little jars line the front of the upper drawer while colorful compartments separate the decorations behind them.
Read also: 20 Bathroom Vanity Shelf Organization Ideas for a Tidier Space
The lower drawer has cutters, bright baking cups and long sticks in their own sections. Try shallow trays for the tiny pieces so they don’t disappear underneath larger tools.
a hutch to repurpose

Want your baking storage to look more like furniture? This image shows a hutch in a coffee-bar makeover, not a finished baking station.
Still, the glass-front upper cupboards and lower drawers offer an idea worth adapting.
You could use a similar hutch for mixing bowls, pans and decorating supplies. Measure your equipment first, especially if you’d like to store a mixer inside.
labeled tubs by category

This is such a straightforward way to sort the little extras. Clear lidded tubs separate liners, cutters, small pans and decorating tools across three shelves.
I love that each tub has one job. Use labels that match how you think about your supplies, then keep the whole category together.
a cupboard ready for sorting

Does your cupboard look a little like this? The image is marked as a before, with bottles, jars and packets filling the shelves.
Small spice jars are tucked behind one another near the bottom.
For a baking-focused reset, I’d start by grouping extracts, spices and raising agents separately. Then decide whether a shallow bin or shelf riser would help you see each group.
an under-shelf basket

Don’t want to add another shelf? This hanging basket gives boxed rolls and bags a spot underneath the existing one.
You could use a similar basket for parchment paper and foil near your baking pans. Check that the basket leaves enough room for the cupboard door to close.
a jar of pastel liners

I love this cupcake liner jar. The pink, blue, yellow and white stacks look so pretty through the clear sides, with a copper-colored lid on top.
Choose a jar with an opening wide enough to lift the liners out without squashing their pleated edges.
rolling pins on display

The rolling pin collection gets its own wall space here! Black brackets hold the pins horizontally against a brown slatted backing.
This is a lovely idea if you have several pins you want to display rather than pile into a drawer. I especially like the mix of dark and pale finishes.
a dedicated mixer cupboard

If you want a whole cabinet devoted to baking, there’s plenty to borrow here. The white mixer sits on a pull-out shelf beneath rows of jars, with a small open drawer and a basket below.
The lights at the top are a lovely detail. I’d keep mixing bowls and mixer attachments in the lower section so the related pieces stay together.
tiny drawers for decorating tools

How cute are those rainbow rows of cupcake liners? This little drawer unit also gives piping tips and other small supplies their own compartments.
Try an organizer with several drawer sizes if your collection includes both tiny tips and larger decorating tools. The floral border is a fun touch if you want something less plain.
shelf risers and upright racks

Last but definitely not least, this comparison shows two very different pan arrangements. The upper view uses shelf risers on the left and upright storage on the right, while the lower view has pans and racks piled together.
Borrow the split setup for your own cupboard: nested round pans in one area and flat trays in another. Start with those two groups before choosing any organizers.
Just a little note - some of the links on here may be affiliate links, which means I might earn a small commission if you decide to shop through them (at no extra cost to you!). I only post content which I'm truly enthusiastic about and would suggest to others.
And as you know, I seriously love seeing your takes on the looks and ideas on here - that means the world to me! If you recreate something, please share it here in the comments or feel free to send me a pic. I'm always excited to meet y'all! ✨🤍
Xoxo Frida