Are your nails doing that weird, flaky thing? Because mine were literally a disaster two weeks ago. I was looking at my hands while I was typing on my laptop and I just sighed. I used to be so obsessed with getting thick gel manicures every single month. I thought it was the only way to look put together. But honestly, the removal process was completely destroying my natural nails.
Last month, I was sitting on my couch watching a true crime documentary. I was getting so stressed out by the show that I started picking at my gel polish. We both know that is the ultimate sin of nail care. But I couldn’t stop myself. I peeled off a whole chunk of gel, and it took the top layer of my actual nail with it. It hurt so bad, and my nail was as thin as a piece of paper. I literally called my sister crying because I thought I ruined my hands forever. She just laughed at me, classic older sister behavior, but it was a serious wake-up call. I realized I needed to ditch the UV light and the harsh chemicals.
That is when I went down a massive late-night internet rabbit hole. I discovered the whole “soap nails” trend. Have you seen this on your feed yet? It is everywhere. It is basically the ultimate “clean girl” aesthetic but for your hands.
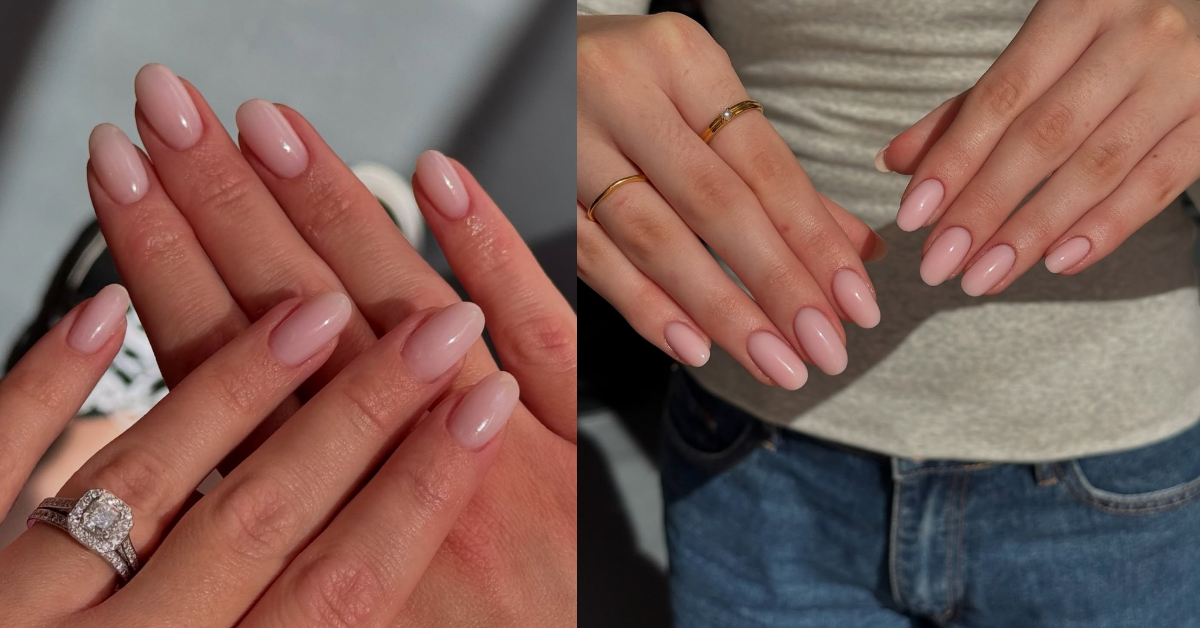
Soap nails are supposed to look like you just stepped out of a luxurious bubble bath. They are super glossy, ultra-sheer, a little bit milky, and they literally look wet. They give off this vibe that you are just naturally glowing and hydrated and perfect, even if you are running on dry shampoo and iced coffee. The best part? You can 100 percent get this exact look at home using regular, old-school nail polish. No gel, no UV lamps, no damage.
I have spent the last few weeks perfecting the routine, and I am so excited to share it with you. Here is my ultimate guide to getting perfect soap nails at home without destroying your nail beds. Let’s get into it!
Step 1: The “Everything Shower” for Your Hands
Okay, the secret to this entire look is that it is 80 percent prep and 20 percent polish. If your hands look dry and ashy, the glossy polish is just going to look weird. You have to treat your hands to a mini spa day first.
I like to start by taking off any old polish with an acetone-free remover. Then, I basically give my hands an “everything shower.” I use this amazing sugar scrub that my Auntie actually made for me. She uses crushed sweetgrass and honey, and it smells so insanely good. I scrub my hands, my wrists, and especially around my knuckles for a good two minutes.
If you don’t have a fancy scrub, you can literally just mix some olive oil and brown sugar from your kitchen. It works exactly the same. Wash it all off with warm water and a really gentle soap. Your hands will instantly feel like pure silk. It is so satisfying.
Your quick prep checklist:
- Scrub it out: Exfoliate everything. Get rid of all that dead skin.
- Gentle wash: Use a moisturizing hand wash, not dish soap!
- Dry completely: Make sure your nails are totally dry before moving on.
Step 2: Cuticle Care is Non-Negotiable
Listen to me very carefully. You cannot skip this step. Soap nails are all about looking flawless and clean, and overgrown cuticles will ruin the whole vibe immediately.
We had a huge family gathering a few months ago for a naming ceremony, and everyone was passing around food and helping out. I was handing a plate of frybread to my grandma, and she grabbed my hand, looked right at my dry, jagged cuticles, and just shook her head. She was like, “Girl, you have to oil these.” I was so embarrassed! Native grandmas will call you out in a heartbeat. But she was totally right.
To get that perfect soap nail base, you need a liquid cuticle remover. You just dab a little bit on the base of each nail and wait about thirty seconds. Then, take a wooden orange stick – not a metal one, those are too harsh – and very gently push the skin back. You will be shocked at how much invisible dead skin scrapes off your nail plate. It is kind of gross but also the most satisfying thing ever.
Only use nippers if you have a really obvious, annoying hangnail. Otherwise, leave the cutting to the professionals. We do not want any bleeding fingers here.
How to win at cuticles:
- Use a liquid remover: It melts the dead skin away so you don’t have to scrape hard.
- Wooden tools only: They are much gentler on your natural nail bed.
- Wipe it clean: Wash your hands again or use a little rubbing alcohol to get the remover off completely.
Step 3: Buffing for that Glass Finish
This is the step that makes regular polish look like gel. Gel polish fills in all the little ridges and bumps on your nails, which is why it looks so perfectly smooth and thick. To fake that look with regular polish, you have to create a glass-like surface first.
Get yourself a really good, fine-grit buffer block. Do not use a rough emery board on the top of your nails, it will ruin them. You just want to lightly buff the surface to smooth out any ridges.
After buffing, you absolutely need a ridge-filling base coat. This is my holy grail product right now. It is basically like a primer for your nails. It fills in any remaining imperfections and creates this beautiful, smooth, cloudy layer. Sometimes, honestly, I just wear the ridge filler by itself because it makes my nails look so clean and healthy.
Smooth it out:
- Light pressure: Don’t buff too hard, you just want to smooth, not thin the nail out.
- Ridge filler is magic: It acts like tiny spackle for your nail beds.
- Let it dry: Give your base coat a solid five minutes to set before adding color.
Step 4: The Perfect Milky Sheer Polish
Okay, now for the fun part. The color. You cannot just use any regular pink polish for this. It has to be sheer. It has to be milky. You want a color that enhances your natural nail, not something that covers it up completely.
We are going for that “my nails but way, way better” vibe. Look for polishes that have words like “sheer,” “jelly,” or “milky” in the name. You want a super pale, translucent pink or a soft, creamy white.
The application is where you have to be careful. Because the polish is sheer, it can get streaky very easily. The trick is to have enough polish on the brush so it glides over the nail, but not so much that it floods your cuticles. I usually do one very thin coat, let it dry for a few minutes, and then do a second thin coat.
I am notoriously impatient when it comes to painting my nails. Last week, I thought they were dry, so I tried to quickly tie my shoes. Big mistake. I smudged my thumb so badly it looked like a crushed strawberry. I had to start the whole thumb over. Do not be like me.
Step 5: The “Wet Look” Top Coat
This is the magic trick. This is what turns a regular sheer manicure into true “soap nails.” You need a top coat that is insanely glossy. You want it to look like your nails are literally wet, even when they are completely dry.
Skip the fast-drying top coats for this look. I know we all love them because they save time, but they tend to dry down a little bit dull over the next few days. Instead, look for top coats that are labeled as “plumping” or “gel-like finish.” These formulas are a little bit thicker and they give that beautiful, rounded, glass-like reflection.
When you apply the top coat, make sure you “cap the free edge.” That means swiping the brush along the very tip of your nail. This seals the polish in and prevents chips. Since we aren’t using gel, we need all the help we can get to make this manicure last a full week.
Top coat secrets:
- Go for plump: Look for gel-effect regular top coats.
- Cap the edges: It makes the manicure last days longer.
- Reapply if needed: Add another layer of top coat on day three to refresh the shine.
Step 6: Drench Everything in Oil
You made it to the final step! Your nails are painted, they are dry, and they look beautiful. But to truly achieve the soap nail aesthetic, your cuticles and hands need to look incredibly hydrated.
Get a bottle of pure jojoba oil. It is the best oil for your nails because the molecules are small enough to actually penetrate the nail bed. Drop a generous amount of oil on every single cuticle and massage it in. Do not just rub it on the skin, rub it over the entire painted nail too. It makes the gloss look even more intense.
I have a funny story about this. The first time I did this full routine, I used way too much oil. My hands were basically slick with it. I walked into the kitchen to grab a snack, tried to pick up a glass jar of salsa, and it literally shot right out of my hands like a rocket. It crashed onto the floor and there was salsa everywhere. I had to clean up a huge mess with perfectly manicured, incredibly slippery hands. It was a disaster, but my nails looked great doing it!
So, use the oil, but maybe wipe your palms off on a towel before you try to open any jars.
Just a little note - some of the links on here may be affiliate links, which means I might earn a small commission if you decide to shop through them (at no extra cost to you!). I only post content which I'm truly enthusiastic about and would suggest to others.
And as you know, I seriously love seeing your takes on the looks and ideas on here - that means the world to me! If you recreate something, please share it here in the comments or feel free to send me a pic. I'm always excited to meet y'all! ✨🤍
Xoxo Frida
